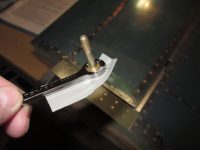
Drilling the Elevator Horns

This is pretty much the last step on the empennage kit! It’s time to double check all the measurements and alignments and drill the last holes on the tail….the elevator horns.  I have read horror stories of people not getting this done correctly, and having to have the horns welded … Continue reading

Fitting The Elevators to the Horizontal Stabilizer

The empennage kit is wrapping up, and almost complete at this point.  All the major assembly is done, and now its just fitting the parts together and lining up the hinges to drill the elevator horns.  The first thing to do is make sure the eye bolts on the elevators … Continue reading

Bending the Left Elevator Leading Edge

After getting the right elevator bent,  it was time to move on the left.  This process is pretty much identical to the right elevator, so I will leave out all the details.  I did it exactly this one the same way as I did the right.  First up is to break … Continue reading

Closing up the Elevators

Tonight I was able to close up and rivet both the left and the right elevators. They had been setting and letting the proseal cure, and now it was time to close them up for good.  I started out with the easiest one first, the right elevator.  This one is … Continue reading

ProSeal Party!

Today was actually a pretty fun day.  I decided to wait on prosealing the rudder and elevators until I could do it all at once, and save on the cost of mixing up two different tubes for two different sessions.  I also took advantage of having some helpful friends to … Continue reading

Riveting the Left Elevator

The primer has dried and cured on my left elevator parts, so theres only one thing left to do… Start assembly and riveting! I started out the session by bending the tabs on the elevator skin.  On this left skin, there are two tiny little tabs that must be folded … Continue reading

Priming the Last Parts of the Empennage!

Well, tonight was priming night, and its the last priming session for the entire empennage! I am kind of glad to be honest, spraying AKZO is an ordeal with all the PPE and prep work that has to be done.  However, it leaves an absolutely awesome primed surface, that is … Continue reading

Building the Trim Tab

I started this session by first dressing the edges of the left elevator skeleton parts, but that only took about 30 minutes, so I decided to find something else to work on.  Since those parts are waiting on priming, the only thing I have left to start on is the … Continue reading

Assembling the Trim Servo and Deburring Parts

I got to do some pretty neat assembly work tonight, working with actual aircraft components, instead of just aluminum!  I worked on assembling the mounting brackets for the Ray Allan Electric Trim servo. I also deburred all of the metal parts for the left elevator skeleton.  The work session started … Continue reading

Preparing the Left Elevator

I managed to get a TON of work done tonight, and worked a straight 4 hours on the section of plans titled “Preparing the Left Elevator”.  In a nut shell, I completely build entire left elevator, and have it disassembled so all the parts can be deburred, and the edges … Continue reading